
Elevating WordPress Search with Elasticsearch
Elasticsearch is a free and open search engine known for its high-speed search capabilities. Within WordPress, its primary advantage lies in replacing the traditional site search, offering an alternative to WordPress’s inherently complex and slower default search function. Despite numerous optimizations, the default WordPress search struggles with scalability. For instance, searching through multiple meta fields significantly slows down the overall site search speed.
Elasticsearch is built to handle large datasets efficiently and excels in scalability. It is adept at performing complex aggregations and supports fuzzy matching, a feature not available in WordPress’s default search tool. These capabilities not only enhance the search speed but also improve the relevance of search results, significantly boosting the search functionality on WordPress sites.
You can install Elasticsearch on your own server, or used a hosted solution like ElasticCloud.
ElasticPress: Your Gateway to Advanced Search in WordPress
ElasticPress is a revolutionary WordPress plugin that forms a bridge between your WordPress site and the advanced search capabilities of Elasticsearch. This plugin automates the indexing of your WordPress content, syncing it seamlessly with an Elasticsearch cluster.
Once you have synced your data, ElasticPress replaces many of the default WordPress queries with Elasticsearch queries. This takes a substantial load off of your server, resulting in an immediate performance boost.
Integrating ElasticPress and Elasticsearch into WordPress
Integrating ElasticPress with your WordPress site is straightforward, follow the steps below.
Plugin Installation
You can install the ElasticPress plugin for free from the WordPress plugin directory. Go to Plugins -> Add New in your WordPress dashboard, and search for ElasticPress. Once installed and activated, go to ElasticPress -> Settings to set up your sync.
Connecting to Elasticsearch
If you use elasticpress.io to manage your Elasticsearch integration, follow their directions to connect to your site. Otherwise, go to the Third-Party/Self-Hosted tab. To allow ElasticPress to index your data, you must provide an authenticated Host URL, which should be structured similarly to the following:
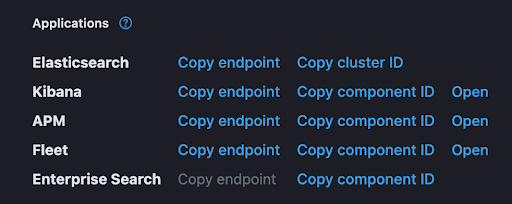
https://<username>:<password>@<host URL>You set up your username and password when creating the deployment; save them since you cannot access them afterward. You can get your Host URL from the cloud console (if you are using the Elasticsearch cloud host), click manage on the deployment you are using, and then click Copy endpoint next to the Elasticsearch application. This URL does not include the authentication parameters. Add them after the `https://` but before the domain name to create the authenticated URL.
Once you have your Host URL, paste it into the indicated field and save. If the connection is successful, ElasticPress will open an onboarding page, prompting you to enable the features you are interested in. Once you have selected the features you want, go to the next step and click on Index Your Content. ElasticPress will run an initial sync, and your site is ready.
Building an Advanced Custom Search Facet with ElasticPress
ElasticPress comes with several Gutenberg blocks that enable filtered searching. These include facets for taxonomy terms, post date, post types, and metadata. However, these facets may not be enough for some specific use cases. In this tutorial, we will build a facet that displays a list of checkboxes for a range of years. ElasticPress does have a facet for filtering by date, but the built-in facet only has a few options, such as 3-6 or 6-12 months old. We will build it as a shortcode that you can add to any archive page, which filters the archive results based on the selected year.
Incorporating Year-Based Data into Elasticsearch Queries
Creating a custom facet for year-based filtering starts with modifying the Elasticsearch request. This way, we can show the post count next to each checkbox when rendering the facet. Add the following code to your theme’s functions.php file:
define( 'YEAR_FACET_AGGREGATE_KEY', 'year' );
define( 'YEAR_FACET_QUERY_KEY', 'ep_year' );

/**
 * Adds year aggregation to the ElasticPress query.
 *
 * @param array $facet_aggs The existing facet aggregations.
 */
function ml_year_facet_wp_query_aggs( $facet_aggs ) {
	$facet_aggs[ YEAR_FACET_AGGREGATE_KEY ] = array(
		'terms' => array(
			'size'  => 100,
			'field' => 'date_terms.year',
		),
	);

	return $facet_aggs;
}

add_filter ('ep_facet_wp_query_aggs_facet', 'ml_year_facet_wp_query_aggs' );
Here’s a breakdown of the code: first, we’re defining a couple of constants to keep track of some information we’ll use throughout the code. First is the key to use for the aggregate results. ElasticPress saves all aggregate results in $_GLOBALS[‘ep_facet_aggs’], and we want it to save the data for years in $_GLOBALS[‘ep_facet_aggs’][‘year’]. The second constant defines the query key used in the URL to specify the years. So, for a URL that is filtering posts published in 2023, we want the query to look like ?ep_year=2023.
Next, we add a custom aggregation by hooking into the ep_facet_wp_query_aggs_facet filter. Our function tells Elasticsearch to aggregate the post-publish dates and place the aggregation data inside aggregations->terms->year when it sends back the post results.
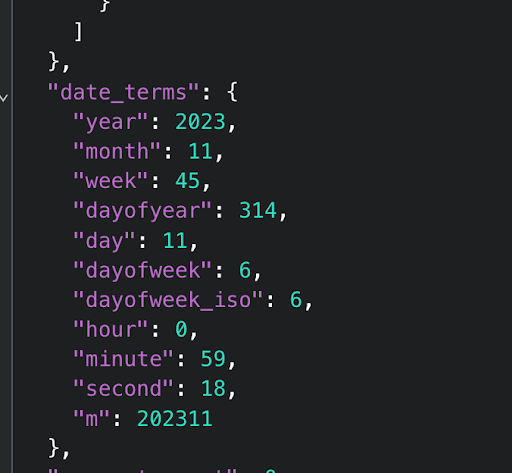
If you are trying to create a custom aggregation, ElasticVue is a helpful tool for viewing the data stored in your Elasticsearch deployment. Using ElasticVue, you can visualize the exact data stored for each document. For example, in the screenshot below, you can see that all documents have date_terms object with several values. This information gave us a value to aggregate, namely date_terms.year.
Refining WordPress Queries for Year-Based Filtering
If a user has checked one or more years, we want to detect that and modify the query to fetch posts from the selected years only. We will hook into pre_get_posts and check for the selected years in the URL.
/**
 * Filters posts by year if years are selected.
 *
 * @param \WP_Query $query The WP_Query object
 */
function ml_year_facet_filter_by_year( $query ) {
	$feature = \ElasticPress\Features::factory()->get_registered_feature( 'facets' );

	if ( ! $feature->is_facetable( $query ) ) {
		return;
	}

	$years = $_GET[ YEAR_FACET_QUERY_KEY ] ?? '';
	$years = array_filter( array_map( 'absint', explode( ',', $years ) ) );

	if ( empty( $years ) ) {
		return;
	}

	// convert years to date query format
	$date_query = array_map( fn( $year ) => array( 'year' => (string) $year ), $years );

	if ( count( $years ) > 1 ) {
		$date_query['relation'] = 'OR';
	}

	// search for all posts that are in any of the selected years
	$query->set( 'date_query', $date_query );
}

add_action( 'pre_get_posts', 'ml_year_facet_filter_by_year' );
In this section of code, we are first checking if the current query is facetable, meaning it can be filtered with ElasticPress facets. If it’s not, we exit right away. Next, we check for selected years in the URL, parse and sanitize them, and then convert them into a WP_Query formatted date query. ElasticPress handles converting this to an Elasticsearch query in the background. Finally, we modify the query to filter posts based on the selected years.
Now that we’ve set up this functionality, you should be able to change the URL and filter posts by year. The URL will look something like this.
https://my-site.local/posts/?ep_year=2023If you have implemented everything correctly, the page will only display posts from the specified year.
Crafting a Year-Based Search Facet Shortcode
The functionality is in place; all we need to do is display the facet. This is the most complex part, and can be implemented many different ways. We’ll provide an example below.
We will copy a portion of the ElasticPress code to display the post-type facet. However, the only functionality required is that clicking on an item adds the corresponding year to the URL using the YEAR_FACET_QUERY_KEY constant, and clicking on a currently selected item will remove that year from the URL, which is fairly simple to implement. In this example, we’ll structure the HTML similarly to the built-in post-type facet so that ElasticPress automatically applies styling and search functionality.
/**
 * Returns the HTML for a single checkbox.
 *
 * @param array  $item The facet item.
 * @param string $url The filter URL.
 */
function ml_year_facet_get_facet_item_value_html( $item, $url ) {
	$label = $item['name'] . ' <span>(' . esc_html( $item['count'] ) . ')</span>';

	$accessible_label = $item['is_selected'] ?
		sprintf( 'Remove filter: %s', $label ) :
		sprintf( 'Apply filter: %s', $label );

	$link = sprintf(
		'<a aria-label="%1$s" %2$s rel="nofollow"><div class="ep-checkbox %3$s" role="presentation"></div>%4$s</a>',
		esc_attr( $accessible_label ),
		$item['count'] ? 'href="' . esc_url( $url ) . '"' : 'aria-role="link" aria-disabled="true"',
		$item['is_selected'] ? 'checked' : '',
		wp_kses_post( $label )
	);

	$html = sprintf(
		'<div class="term level-0 %1$s %2$s" data-term-name="%3$s" data-term-slug="%4$s">%5$s</div>',
		$item['is_selected'] ? 'selected' : '',
		! $item['count'] ? 'empty-term' : '',
		esc_attr( strtolower( $item['value'] ) ),
		esc_attr( strtolower( $item['value'] ) ),
		$link
	);

	return $html;
}
This is the code for a single checkbox, it is largely copied from ElasticPress to match their existing facets. Finally, the code for registering the shortcode:
/**
 * Adds the year facet shortcode.
 *
 * @param array $atts The shortcode attributes.
 */
function ml_year_facet_shortcode( $atts ) {
	$atts = shortcode_atts(
		array(
			'min'   => 1990,
			'max'   => gmdate( 'Y' ),
			'order' => 'desc',
		),
		$atts,
		'year_facet'
	);

	$min_year = absint( $atts['min'] );
	$max_year = absint( $atts['max'] );
	$order    = 'desc' === $atts['order'] ? 'desc' : 'asc';
	$years    = range( $min_year, $max_year );

	if ( 'desc' === $order ) {
		$years = array_reverse( $years );
	}

	$selected_years = $_GET[ YEAR_FACET_QUERY_KEY ] ?? '';
	$selected_years = array_filter( array_map( 'absint', explode( ',', $selected_years ) ) );

	$searchable = count( $years ) > 10;

	// display the facet
}

add_shortcode( 'year_facet', 'ml_year_facet_shortcode' );
First we’re defining some variables, creating an array of years, and checking for whether the facet is searchable. We will provide some options for the shortcode so that you can reverse the order of the years and specify minimum and maximum years, and this code parses those values. Add this code right below // display the facet.
// display the facet

ob_start();

?>

<div class="wp-block-elasticpress-facet">
    <div class="terms<?php echo $searchable ? ' searchable' : ''; ?>">
        <?php if ( $searchable ) : ?>
            <input class="facet-search" type="search" placeholder="<?php esc_attr_e( 'Search year' ); ?>">
        <?php endif; ?>

        <div class="inner">
            <?php
            // display selected years at the top
            foreach ( $selected_years as $year ) {
                $new_years = array_filter(
                    $selected_years,
                    function ( $selected_year ) use ( $year ) {
                        return $selected_year !== $year;
                    }
                );

                $count = $GLOBALS['ep_facet_aggs'][ YEAR_FACET_AGGREGATE_KEY ][ (string) $year ] ?? 0;
                $url   = empty( $new_years ) ? remove_query_arg( YEAR_FACET_QUERY_KEY ) : add_query_arg(
                    YEAR_FACET_QUERY_KEY,
                    implode( ',', $new_years )
                );

                $data = array(
                    'is_selected' => true,
                    'count'       => $count,
                    'name'        => $year,
                    'value'       => $year,
                );

                echo ml_year_facet_get_facet_item_value_html( $data, $url );
            }

            foreach ( $years as $year ) {
                if ( in_array( $year, $selected_years, true ) ) {
                    continue;
                }

                $count = $GLOBALS['ep_facet_aggs'][ YEAR_FACET_AGGREGATE_KEY ][ (string) $year ] ?? 0;

                $new_years   = $selected_years;
                $new_years[] = $year;

                $url = add_query_arg(
                    YEAR_FACET_QUERY_KEY,
                    implode( ',', $new_years )
                );

                $data = array(
                    'is_selected' => false,
                    'count'       => $count,
                    'name'        => $year,
                    'value'       => $year,
                );

                echo ml_year_facet_get_facet_item_value_html( $data, $url );
            }
            ?>
        </div>
    </div>
</div>
<?php
$output = ob_get_clean();

wp_enqueue_script( 'elasticpress-facets' );
wp_enqueue_style( 'elasticpress-facets' );

return $output;
This code uses output buffering (ob_start() and ob_get_clean()) to track any rendered HTML and store it in a string instead of rendering it directly. First, it loops through the selected years, displaying them in a checked state at the top. Each is essentially a link to an updated URL that excludes the year corresponding to the checkbox.
Clicking one of these links will reload the page with the new list of years selected. It uses the same process for the rest of the years, with the difference being it adds each year to the URL instead of removing it. Finally, it ensures the page loads the ElasticPress facet styles and scripts by enqueuing them.
Once this shortcode is in place, you can add [year_facet] to any archive page. Selecting a year will filter the results and update the facet content.
Wrapping Up: The Future of Advanced Search in WordPress
Congratulations! You now have a fully functioning custom search facet for your website. Creating custom facets is fairly simple and gives you full control over the content, filtering methods, and style.
Integrating Elasticsearch with WordPress via ElasticPress is not just about enhancing search capabilities; it’s about transforming the way users interact with your content. With advanced search options, including custom facets like the year-based filter, WordPress sites become more user-friendly, efficient, and capable of handling large-scale data.
Please leave a comment below if you have any questions. If you would like help implementing Elasticsearch for your website, let us know on our contact page.